HTTP and JSON
Today we will use HTTP as communication protocol and JSON as serialization format to send data, from a client to a server and from a server to a client.
HTTP Client Requests: Checking the News
Let us first make a HTTP request for the most common job: requesting the content of a website. Of course, you know what happens when you make a request to https://www.nrk.no/ via your browser. But there are other ways you can make such a request.
Checking the News via Curl
Use the command line tool `curl to request the website:
curl --verbose https://www.nrk.no/
curl --verbose https://www.nrk.no/Can you read some of the headlines?
What happens if you try to use the URL http://www.nrk.no/ instead? What does the response say? Can you find out what this response means?
Checking the News via Python
You can make requests also programmatically, that means, as part of a program running in Python. For that, a dedicated package requests exists that lets you make requests and parse the response in a simple way.
Install the requests package:
python3 -m pip install requests
python3 -m pip install requestsWith this package installed, the program to make a request to a website looks like this:
import requests

url = "https://nrk.no/"
response = requests.get(url)
print(response.text)
import requests

url = "https://nrk.no/"
response = requests.get(url)
print(response.text)
The request returns a data structure of the type Response which contains the answer as a text field, which we simply print out.
Have a look at the output, it should be the same as the one obtained with curl.
HTTP Client Requests: Checking the Weather
So these were requests to get the content of a website. But HTTP can also be used in a different way. Yr.no provides weather information, which most people access either via the website or the mobile app. Yr also offers an API so that other applications can obtain weather information, that means, they can access the weather forecast without downloading the website.
The API of Yr is explained here in detail..
Select the box that says GET/compact, as shown in the figure below.
This box lets you try out a request, directly from the website.
The required input data are latitude and longitude.
For Trondheim, those are lat=63.43 and lon=10.39.
Use the API documentation on the website to make a request, and browse through the response you get in the answer box below. Check if you can recognize some of the values and if they are more or less what you expect.

Weather via Curl
We can also do the same HTTP request from our command line using curl:
curl 'https://api.met.no/weatherapi/locationforecast/2.0/compact?lat=63.43&lon=10.39'
curl 'https://api.met.no/weatherapi/locationforecast/2.0/compact?lat=63.43&lon=10.39'Weather via Python
Let us use Python again for making the same request, with the requests module as done above. Find the correct URL from the API website.
import requests

url = "https://api.met.no/weatherapi/locationforecast/2.0/compact?lat=63.43&lon=10.39"
response = requests.get(url)
print(response.text)
Run the code, document the result.
The Yr API provides its response as a JSON-formatted string. For that reason, we can ask the response to provide us the format in JSON via the function response.json() which you can also print via print(response.json()).
import requests

url = "https://api.met.no/weatherapi/locationforecast/2.0/compact?lat=63.43&lon=10.39"
response = requests.get(url)
print(response.json())
The requests module has already transformed the JSON-formatted string in to a set of corresponding Python data structures, which consists of dictionaries and lists. When we print these with the normal print() function, the data structure doesn't look very nice, and it is hard to understand how the data is nested. Therefore, Python has a function for printing data in a pretty way:
from pprint import pprint

# your code...

pprint(response.json())
from pprint import pprint

# your code...

pprint(response.json())
Notice that we use now the function pprint() instead of print() to print things pretty. Pretty good, huh?
Pretty-print the response as JSON structure of dicts and lists, and document a few lines to give an illustration of its structure.
from pprint import pprint
import requests

url = "https://api.met.no/weatherapi/locationforecast/2.0/compact?lat=63.43&lon=10.39"
response = requests.get(url)
pprint(response.json())
Finding the Temperature
The response provides the current forecast for a location, that means, several hours and even days ahead. It also contains so-called meta-data which explains details about the data. These are all useful, but make the structure of the response a bit complex. For now, we are just interested in the air temperature.
Can you find the data field air_temperature?
When we want to use the temperature in our program, we need to extract it out of this complex structure.
Starting from the dictionary you receive with response.json() function, can you navigate to the air temperature that is closest to the current time?
- Work step by step.
- Pretty print the structure after each step.
- Print the keys of a dictionary using its
keys()function, for exampleresponse.json().keys(). - Access a field in a dictionary with the square brackets, for instance
response.json()['geometry']. - If you find a list, access its first element with
list[0]or its last withlist[-1].
This can be a bit of a puzzle, but should be no problem in the end.
Function for the Temperature
Using the code above, create a function that takes the latitude and longitude as input arguments and that returns the air temperature at that location. This is how the function should look like:
def get_air_temp(lat, lon):
	# TODO make a request
	# TODO return only the value of the air temperature only
def get_air_temp(lat, lon):
    # TODO make a request
    # TODO return only the value of the air temperature only
Remember that Python lets you create a string that includes variables with the format() function:
lat = ...
lon = ...
url = "https://api.met.no/weatherapi/locationforecast/2.0/compact?lat={}&lon={}".format(lat, lon)
lat = ...
lon = ...
url = "https://api.met.no/weatherapi/locationforecast/2.0/compact?lat={}&lon={}".format(lat, lon)
A newer and more compact way to format strings and integrate variables is using f-strings, where you write the variables directly into curly brackets. (Note the f before the string.)
lat = ...
lon = ...
url = f"https://api.met.no/weatherapi/locationforecast/2.0/compact?lat={lat}&lon={lon}"
lat = ...
lon = ...
url = f"https://api.met.no/weatherapi/locationforecast/2.0/compact?lat={lat}&lon={lon}"
Let's make this a bit more compact for later, so that we store the coordinates of a few places and only have to provide place names. We can for instance simply code them in a nested dictionary:
places = {
	"Trondheim": {"lat": 63.43, "lon": 10.39},
	"Oslo": {"lat": 59.91, "lon": 10.75},
	"Bergen": {"lat": 60.39, "lon": 5.32},
	"Avaldsnes": {"lat": 59.35, "lon": 5.27},
	"Tromsø": {"lat": 69.64, "lon": 18.95},
}
places = {
    "Trondheim": {"lat": 63.43, "lon": 10.39},
    "Oslo": {"lat": 59.91, "lon": 10.75},
    "Bergen": {"lat": 60.39, "lon": 5.32},
    "Avaldsnes": {"lat": 59.35, "lon": 5.27},
    "Tromsø": {"lat": 69.64, "lon": 18.95},
}
With this dictionary declared globally in the file (above any function definitions), create a new version of the function to compare the air temperature:
def get_air_temp_2(place):
	# create the function
def get_air_temp_2(place):
    # create the function
Fantastic---we now have a compact function that gets the temperature forecast from Yr so we can use it later in our application. We'll come back to it.
Smart Temperature Sensor
We now want to create a system that combines HTTP requests to create a more advanced temperature display. Instead of just showing the local temperature of a sensor, it should also show the predicted temperature. Below is a figure of the setup:
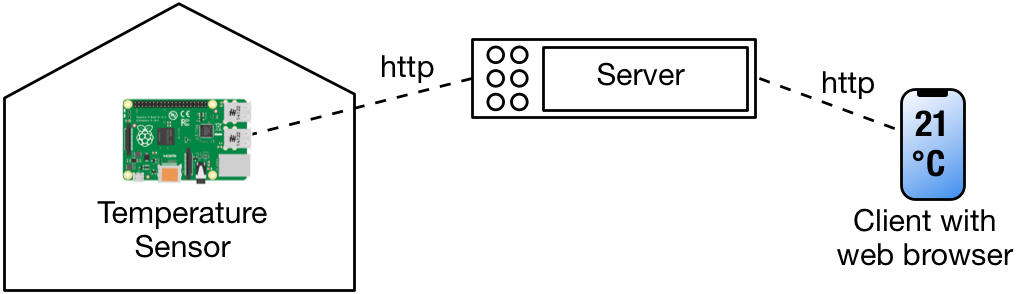
- The sensor periodically measures its temperature and provides it to the server in the center, using HTTP POST requests.
- The server stores the temperature of the temperature sensor, and periodically requests the temperature forecast from the API from yr.no via HTTP GET requests.
- The server also answers GET requests from clients to present both the sensor temperature and the prediction from yr.no in a single page.
Create a sequence diagram with three components: temperature sensor, the server, Yr and the mobile client. Illustrate with the sequence diagram how the temperature sensor updates the server with the measured temperature, and how the mobile client makes a request to our server, which also involves getting the temperature forecast from Yr.
Code for the Web Server
Above we have initiated HTTP requests as clients to get news and weather, and combined two weather requests to a little program. Now we want to also build a web server so that we can accept HTTP requests and answer them. As you have learned in the preparation, HTTP is not a symmetric protocol; client and server work very differently. The code for the server handling a requests therefore also works very differently from the one making a request.
Copy the following code into a file webserver.py. The code declares some functions, and then a class RequestHandler, which defines a web server. It then configures and starts this web server, which is then active and waits for GET requests.
from http.server import HTTPServer, BaseHTTPRequestHandler
from urllib.parse import quote, unquote
import json
import socket


def extract_json_string(string):
	start = string.find("{")
	stop = string.rfind("}")
	return string[start : stop + 1]


def get_ip_address():
	return socket.gethostbyname(socket.gethostname())


def dictionary_to_string(dictionary):
	return json.dumps(dictionary)


def json_string_to_dictionary(json_string):
	return json.loads(json_string)


def encode_string_into_url(string):
	return quote(string)


def decode_url_back_to_string(url_encoded_string):
	return unquote(url_encoded_string)


def string_to_unicode_bytes(string):
	return string.encode("utf-8")


class RequestHandler(BaseHTTPRequestHandler):
	def store_data(self, name, data):
		if not hasattr(self.server, "data"):
			self.server.data = {}
		self.server.data[name] = data

	def load_data(self, name):
		if hasattr(self.server, "data"):
			if name in self.server.data:
				return self.server.data[name]
		return None

	def do_GET(self):
		# Phase 1: What has been requested?
		print("-------- Incoming GET request --------")
		print("  Request data: {}".format(self.requestline))

		# Phase 2: Which data do we want to send back?
		response = "Hei hei"

		# Phase 3: Let's send back the data!
		response_in_bytes = string_to_unicode_bytes(response)
		self.send_response(200)
		self.send_header("Content-type", "text/plain")
		self.end_headers()
		self.wfile.write(response_in_bytes)


port = 8023
httpd = HTTPServer(
	("", port),
	RequestHandler,
)
print("")
print(" ******** TTM4175 Web Server  ******** ")
print(
	"    The server will be reachable via  http://{}:{}/".format(get_ip_address(), port)
)
print("    Terminate the server via Ctrl-C.")
print(" ************************************* ")
print("")
httpd.serve_forever()
from http.server import HTTPServer, BaseHTTPRequestHandler
from urllib.parse import quote, unquote
import json
import socket


def extract_json_string(string):
    start = string.find("{")
    stop = string.rfind("}")
    return string[start : stop + 1]


def get_ip_address():
    return socket.gethostbyname(socket.gethostname())


def dictionary_to_string(dictionary):
    return json.dumps(dictionary)


def json_string_to_dictionary(json_string):
    return json.loads(json_string)


def encode_string_into_url(string):
    return quote(string)


def decode_url_back_to_string(url_encoded_string):
    return unquote(url_encoded_string)


def string_to_unicode_bytes(string):
    return string.encode("utf-8")


class RequestHandler(BaseHTTPRequestHandler):
    def store_data(self, name, data):
        if not hasattr(self.server, "data"):
            self.server.data = {}
        self.server.data[name] = data

    def load_data(self, name):
        if hasattr(self.server, "data"):
            if name in self.server.data:
                return self.server.data[name]
        return None

    def do_GET(self):
        # Phase 1: What has been requested?
        print("-------- Incoming GET request --------")
        print("  Request data: {}".format(self.requestline))

        # Phase 2: Which data do we want to send back?
        response = "Hei hei"

        # Phase 3: Let's send back the data!
        response_in_bytes = string_to_unicode_bytes(response)
        self.send_response(200)
        self.send_header("Content-type", "text/plain")
        self.end_headers()
        self.wfile.write(response_in_bytes)


port = 8023
httpd = HTTPServer(
    ("", port),
    RequestHandler,
)
print("")
print(" ******** TTM4175 Web Server  ******** ")
print(
    "    The server will be reachable via  http://{}:{}/".format(get_ip_address(), port)
)
print("    Terminate the server via Ctrl-C.")
print(" ************************************* ")
print("")
httpd.serve_forever()- Read carefully through the code, starting in the line where we assign a port, and then the definitions of classes and functions above.
- You can ignore the functions
store_data()andload_data()for now. - Pay special attention to the function
do_GET(). This will be the core of what we do today. - Be patient. Ask questions to each other, make sure everyone gets it.
A detail: You may see that the do_GET() function only has self as parameter (from the class), and does not have a return value.
This may be surprising, since it should get the request as input and then compute an answer. However, see how the code above gets access to the request via the attribute self.requestline. Similarly, the response is created by calling some functions on the parent class, for instance self.wfile.write(response_in_bytes). So therefore the do_GET() function does not have any input or return parameters. It's more a question of how the API is designed, the authors have made a decision here.
Run the code, like any Python program via python webserver.py.
Note: Whenever you are going to change the code of the web server, you will need to terminate it via Ctrl-C and then restart it.
Request via Web Browser
- Either on the same machine, or (even better) on a different machine in case you are in the same network, access the website address that the server prints out in a browser.
- If you access the browser on the same machine, you can type
http://localhost:8023/as address. Otherwise, use the IP address instead oflocalhost. - What happens in the browser, and what happens in the command where the server program runs?
- Create a sequence diagram of what you have just observed, and annotate it with details that you find relevant.
- Answer the following questions:
- In which format is the answer sent from the webserver to the client? Which steps are involved to convert the data for the response?
- What happens if you send the request to the wrong port, for instance port
8001?
Sending Data to the Server
We can send additional data with our request, by appending it into the URL as follows:
http://localhost:8000/?data={"time": "12:05", "temperature": 20.0, "humidity": 54.3}
http://localhost:8000/?data={"time": "12:05", "temperature": 20.0, "humidity": 54.3}Sending Data via the Browser
- Copy the URL from above, but adjust it to your IP address (if necessary).
- Paste the entire URL with the data part into your browser.
- Observe what happens in the address line after the response returns. Did the browser change the data you wanted to transmit?
- Check which information was received by the server.
- Has the data been transformed somehow?
GET and POST on the Server
Look again at the figure. Form the task above, we have already the GET command in place (by function do_GET()). With this command, we offer the browser (here shown as phone) a website so we can read the temperature.
To let the sensor inform the server about the temperature, it uses instead the POST command.
So, to repeat:
-
Here, the
do_GET()function processes the requests from browsers that want to know the temperature, and it works pretty much like the GET for any other website; we return a complete website to the browser that shows the temperature. -
With the
do_POST()function, a smart sensor (which we imitate with another Python program) can tell the sensor which temperature it measured.
The temperature sensor and the browser to show the temperature to a user are acting completely independently. (Of course, the server can only show a temperature to a browser if the temperature sensor has at least updated the temperature once.)
Run the code, like any Python program via python webserver.py.
Add a function do_POST(): in addition to the already existing do_GET() function. See the code below for that function.
def do_POST(self):
	"""HTTP POST request as it comes from the sensor device application,
	for instance to send the current temerature."""

	print("-------- Incoming POST request --------")
	print("  Request data: {}".format(self.requestline))

	decoded_request = decode_url_back_to_string(self.requestline)
	print("  Decoded data: {}".format(decoded_request))

	json_string = extract_json_string(decoded_request)
	print("  Extracted JSON string: {}".format(json_string))

	dictionary = json_string_to_dictionary(json_string)
	print(dictionary)

	# We extract the temperature...
	temperature = dictionary["temperature"]
	print(f"Temperature {temperature} received in do_POST()")
	# ...and store it
	# self.store_data("temperature", temperature)

	# Phase 2: Which data do we want to send back?
	response = "ok"

	# Phase 3: Let's send back the data!
	response_in_bytes = string_to_unicode_bytes(response)
	self.send_response(200)
	self.send_header("Content-type", "text/plain")
	self.end_headers()
	self.wfile.write(response_in_bytes)
def do_POST(self):
    """HTTP POST request as it comes from the sensor device application,
    for instance to send the current temerature."""

    print("-------- Incoming POST request --------")
    print("  Request data: {}".format(self.requestline))

    decoded_request = decode_url_back_to_string(self.requestline)
    print("  Decoded data: {}".format(decoded_request))

    json_string = extract_json_string(decoded_request)
    print("  Extracted JSON string: {}".format(json_string))

    dictionary = json_string_to_dictionary(json_string)
    print(dictionary)

    # We extract the temperature...
    temperature = dictionary["temperature"]
    print(f"Temperature {temperature} received in do_POST()")
    # ...and store it
    # self.store_data("temperature", temperature)

    # Phase 2: Which data do we want to send back?
    response = "ok"

    # Phase 3: Let's send back the data!
    response_in_bytes = string_to_unicode_bytes(response)
    self.send_response(200)
    self.send_header("Content-type", "text/plain")
    self.end_headers()
    self.wfile.write(response_in_bytes)
We use from now on the do_GET() function to serve the web site that displays the temperature, and the function do_POST() to receive data from the temperature sensor. The web server can hence process two different requests: one for storing data, one for serving a website that presents the data.
Sending Data via Python Requests
We now want to send data to the web server from Python. In a real system, a sensor should do this automated and in periodic intervals. (As we work without special hardware, we are happy with a Python program that just imitates the temperature sensor.) This code sends the data to the web server, using a POST request:
import requests
import json
from urllib.parse import quote, unquote


def dictionary_to_string(dictionary):
	return json.dumps(dictionary)

def encode_string_into_url(string):
	return quote(string)

def print_response(response):
	print('-------- Response --------')
	print('Status code: {}'.format(response.status_code))
	print('-------- Content--------')
	print(response.text)
	print('------------------------')

# example data
dictionary = {}
dictionary['temperature'] = 20.0
dictionary['sensor_name'] = 'kitchen'

# ... your code ...

response = requests.post('http://192.168.86.104:8000/?data={}'.format(...))
print_response(response)
import requests
import json
from urllib.parse import quote, unquote


def dictionary_to_string(dictionary):
    return json.dumps(dictionary)

def encode_string_into_url(string):
    return quote(string)

def print_response(response):
    print('-------- Response --------')
    print('Status code: {}'.format(response.status_code))
    print('-------- Content--------')
    print(response.text)
    print('------------------------')

# example data
dictionary = {}
dictionary['temperature'] = 20.0
dictionary['sensor_name'] = 'kitchen'

# ... your code ...

response = requests.post('http://192.168.86.104:8000/?data={}'.format(...))
print_response(response)- Create a new client program with the code above.
- Add the necessary lines to convert the data to send, use the included functions.
- Document what these functions actually do.
- With the server from before running, execute the client code.
- Document what happens.
Decoding Data in the Server
- Pay attention to the method
do_POST()in the server - What is happening in the code that we provided in the method
do_POST(), step by step?
Storing Temperature Data in the Server
The web server should store the temperature that the sensor sends in. So we need some way to store data in the web server. In a real system, this is done with data bases or more powerful storage solutions optimized to serve many requests. For our little server, just storing the data in a Python dictionary is enough.
We use the two functions store_data() and load_data() shown below to store or load data.
def store_data(self, name, data):
	if not hasattr(self.server, "data"):
		self.server.data = {}
	self.server.data[name] = data

def load_data(self, name):
	if hasattr(self.server, "data"):
		if name in self.server.data:
			return self.server.data[name]
	return None
def store_data(self, name, data):
    if not hasattr(self.server, "data"):
        self.server.data = {}
    self.server.data[name] = data

def load_data(self, name):
    if hasattr(self.server, "data"):
        if name in self.server.data:
            return self.server.data[name]
    return None
As you see, these functions use the self.server attribute, which provides access to the actual server instance.
From there, we can access a variable data that is a dictionary so that we can store variables by name.
I this way we can store data also between different calls of the do_GET() and do_POST() functions.
To repeat and clarify:
do_POST()stores the temperature data submitted by the temperature sensor application,do_GET()provides the website with the the data from the sensor and the air temperature obtained from the forecast.
Uncomment the storage for the temperature in the code.
Optional Task: Adding the Yr Forecast
Extend your server logic so that it does not only return the temperature of the sensor, but also the temperature forecast from yr, so that it is displayed together.
Use the function for getting the forecast you have developed above. This means you web server which acts as a server because it implements the methods GET and POST, now also acts as a client towards Yr.no since it requests data from it.
Optional Task: Nice HTML Output
Now that we can send a simple string as a response, let's make the answer more advanced and send a proper website in HTML. HTML is in principle also only a string, but the browser reads the formatting tags and creates a nicely rendered page out of it. The following code contains a simple Python method that creates some HTML:
def generate_basic_html_page(title='Default Title'):
lines = []
lines.append('')
lines.append(' {} '.format(title))
lines.append(' ')
lines.append(' Hello!
')
lines.append(' This is a very simple HTML page. It even contains a link.
')
lines.append(' ')
lines.append('')
return '\n'.join(lines)
def generate_basic_html_page(title='Default Title'):
    lines = []
    lines.append('<html>')
    lines.append('    <head><title>{}</title></head>'.format(title))
    lines.append('    <body>')
    lines.append('        <h1>Hello!</h1>')
    lines.append('        <p>This is a very simple HTML page. It even contains a <a href="http://www.ntnu.no">link.</a></p>')
    lines.append('    </body>')
    lines.append('</html>')
return '\n'.join(lines)-
Copy the code above into the web server file from above. Place the function just below the import statements, so that it is at the top level of the file. (Not within the class declaration.)
-
Exchange the simple string in the web server so that it instead returns the HTML page created by this function.
-
To make all correct and tidy, update the line where we set the content type so that it uses
self.send_header("Content-type", "text/html"). -
Now go back to the browser, and access the website again. What changed?
-
Can you set the title of the website?
-
Let the function receive the temperature from the sensor and the one from the forecast, and format the information in HTML to include these values.
Things to Remember
- HTTP can be used for more than just websites, it can also be used to let applications in general transport any type of data.
- JSON can be used as a convention how to serialize data types, and then serve as format to send over HTTP.