Programming IoT Devices
Setup
- Install Chrome, or a Chrome-based browser. These browser support an interface called Web USB, so that you can directly connect to your Microbit from the browser.
The Microbit
In today's lab we use many of the existing resources about the Microbit that you can find online.
The Microbit Hardware
Start by learning about all the sensors and actuators on the Microbit:
The Microbit Software
The Microbit can be programmed in Python, using a special version of it that is called MicroPython. Go through the Python Guide:
We are going to use the web editor, and connect with the Microbit via Web USB:

Run a Test Program
Create a file hei.py with the following content:
from microbit import display

while True:
	display.show("HEI!")
from microbit import display

while True:
    display.show("HEI!")
Exploring an API
In the section above, we showed you a couple of functions that you can use to control the Microbit. Whenever you do programming, exploring an API will be an important part of your work. There are several strategies to explore an API, which you will also mix as you go along.
Step 1: Find out which functions you need
First you need to find out which functions there are at all, and how they are called. For that, you have several options:
- Look at a tutorial or read a book, which presents you a couple of functions and how to call with some examples, like we did above.
- Read the code documentation, which sometimes also provides examples and overview explanations.
- Search on the web.
Step 2: Find out how to use the function
Once you first know which function you need to use, you need to figure out how to use it. This means, which parameters are there and what do they do. You can figure out these more detailed questions in different ways:
- Browsing an API documentation, like when you follow the links to the functions above. Such API documentation is often generated by extracting the comments in the source code, and for good libraries they should give you a complete picture.
- Editors often offers auto-completion. Just place your cursor after the dot of a variable. If the tool can infer which type the variable has, and if it finds the source code for the library where that type is defined, it can show you a popup window that explains the function call.
Experience Helps...
After some time, you will also become more experienced with APIs, and sometimes you can guess which functions there probably are and how they are most likely called. In that case, you can start typing and look in the auto-completion for something that matches.
After you finished the other tasks below, reflect on how you manage to use the API for using the components of the Microbit. What was easy? What is challenging? What helped?
Application Examples
Some of the applications of an IoT device follow a very simple programming pattern, in which it waits for a condition to be true, and then does something. This is illustrated in the code skeleton below:
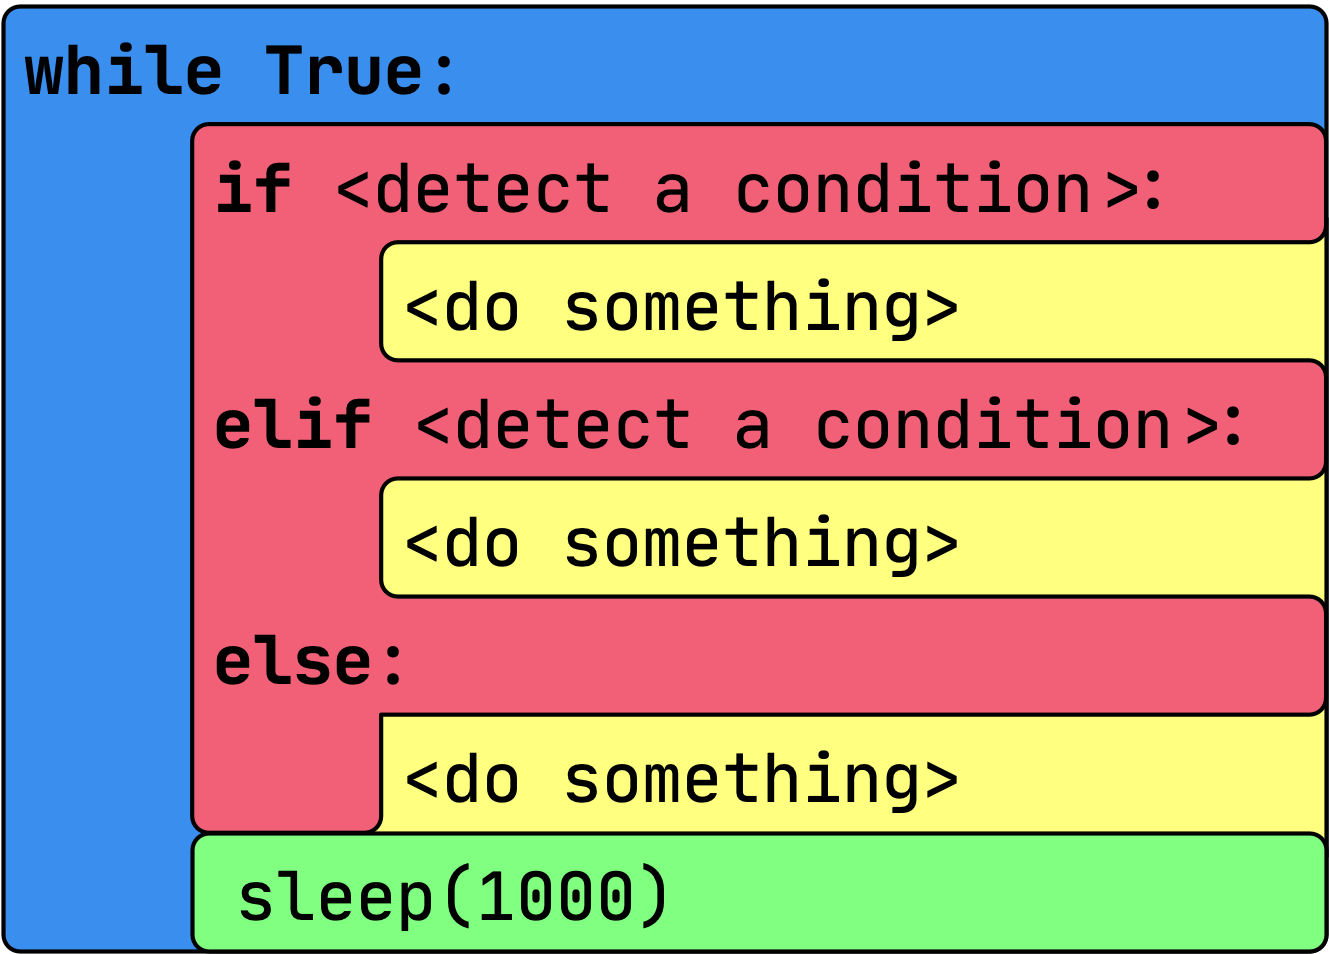
- The outer while loop keeps the device running. As soon as you reach the end, it starts again at the top of the loop.
- The if-statement checks for one or more conditions. It can for example read the temperature sensor, ask if a button was pressed or a gesture detected.
- Depending on the detected case, the device can react with different actions, like showing something on the display.
- The sleep statement lets the device pause for a bit. It specifies a number of microseconds that the device does nothing and waits before it goes into the next iteration and starts again at the top of the while-loop. The sleep is not necessary for all cases, but can be useful when you show something on the display and keep it visible for some time. In a real device that is powered by a battery, sleeping also helps to preserve energy. (This is usually implemented with a different method than sleep as shown here, but the principle for the code is the same.)
Let's use this application pattern in some examples. In the following, we show you some of the ideas of the Microbit documentation. Go through these examples step by step. For each example, do the following:
- Sketch a solution individually first, then together in your team.
- Make it run.
- Compare your solution with the one given in the documentation.
Show how the applications work with a short sequence of photos you take of the Microbit. Describe what the code does.
Build the example as described above.
Build the example as described above.
Max-Min Thermometer
Measure the temperature regularly. When you press button A, show the minimum temperature. When you press button B, show the maximum temperature.
Build the example as described above.
(Extra) Think about how to add an extra function, so that you can reset the temperatures when both buttons are pressed. Build it.
(Extra) Create Your Own Application
Inspired by the examples, brainstorm around some ideas you could try out with the simulated device.
- Think individually for a few minutes.
- Present your idea -- no matter how good you think it is -- to the others. Collect all ideas. (Be positive in this first round.)
- Look at the collected suggestions. Which one do you want to build together? Maybe adjust suggestions, or combine ideas.
Build your own application.
Document your application with the help of a series of screen shots and a description. Explain your idea, show the code, and explain how it works.
Remember to go back to the reflection task above about how to use a new API.