State Machines in Micro Python
The state machines were so far expressed as diagrams, that means pictures. In this part we are going to explore how we can implement the state machines as Python code.
The Microbit we are going to program does not run all Python code, but only a reduced set of it. This subset is called MicroPython. To run state machines on it, we will provide you with some code that serves as a template or a skeleton. We create the state machines by manually translating a diagram step for step into a Python function that executes transitions.
Idea 1: Storing the State
In a "normally coded" program, the progress of an application is stored indirectly in the form of the program counter. Simplified said, the program remembers in which line it currently is, and then proceeds, statement for statement, including loops and branches.
To execute a state machine, we use an extra variable that explicitly stores the current state of the program, and which corresponds to the state in the state machine. For simplicity, we store the variable as a string, which corresponds to the name of the state from the diagram.
A state machine reacts on events based on its state. For example, a simple blinking light that switches between on and off reacts differently on each timeout that happens. If the lamp is currently on, it is switched off, and if the lamp is currently off, it is switched on. This is the state machine:

We can encode this in Python as an if-statement that takes the current state as condition:
if state == "on":
    # switch light off
    # change into state "off"
elif state == "off":
    # switch light on
    # change into state "on"
if state == "on":
    # switch light off
    # change into state "off"
elif state == "off":
    # switch light on
    # change into state "on"
Idea 2: A Transition Function
Now that we have taken care of the control state by an explicit variable, we need to think how to implement the transitions. Let's think again what a transition actually does:
- It is triggered by an event.
- It takes a state machine from one state to another state.
- While it executes, it can do some actions and maybe decide between alternative branches.
To implement transitions, we define a function that executes them. The method receives the following parameters:
state- the current state of the machineevent- the event that triggered the machinetimers- a variable to start and stop timers
def transition(self, state, event, timers):
    # logic to execute the transitions
def transition(self, state, event, timers):
    # logic to execute the transitions
In the if-statement above, we change what we do only based on the current state.
This was okay because every state of the blinking light only had a single outgoing transition.
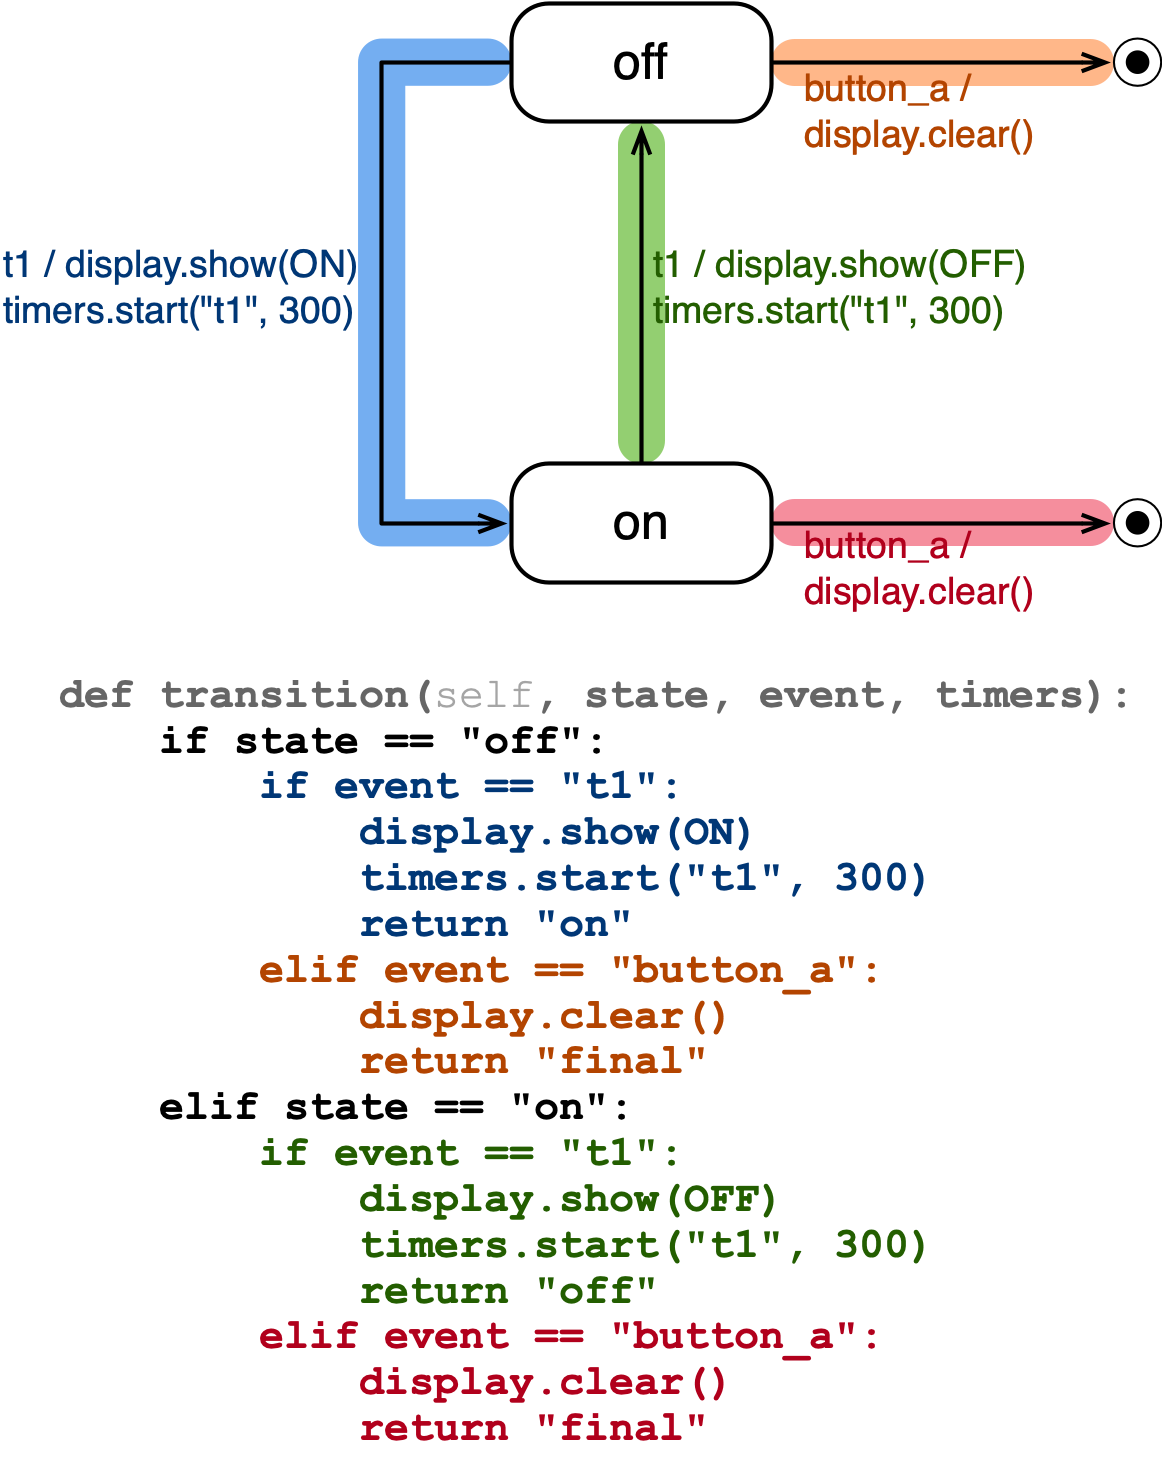
But if we consider now that we can also switch off the blinking light by pressing a button, we need to distinguish if the event was a timer expiration t1 or a click on a button button_a.
We do this with a nested if-statement.
The listing below shows the transition function for a simple example. (Ignore the parameter self for now.)
Within the method, we place first an if-statement which distinguishes the different states of the machine.
It has one branch for each state.
Within each state branch, there is another if-statement, which distinguishes the different events.
Next State
You can see in the code above that the transition function returns a string which is the target state of the transition. The blue code, for example, triggered by t1 in state off returns on, which is the next state for that transition.
Events
The events are fed into the transition function also as strings.
- Timer expirations like
t1,t2,t3. (For now, the number of timers in our simple machines is limited to these three.) - Button events
button_aandbutton_b. - Gestures
shake.
Actions
Within these branches, we then do actions:
- Starting timers: Using the passed variable
timers, you can calltimers.start("t1", 300)to start a timer with namet1and 300 milliseconds timeout. - Stopping timers: You can also stop a timer with
timers.stop("t1"). - Call a Microbit function: call a function to do something in the Microbit, like using the display.
- Change a variable. You can assign new values to variables, too. You only need to make sure that you access the variables via the parameter
self, which we describe better below.
There is also some stuff that you should not do as part of a transition:
- You can use the
print()statement for debugging, but be careful. In some of my examples it slowed down everything. I guess this is because of the communication of the user interface with the code. So just remove any print-statements if you have troubles. - You should not do other "long-running" operations within a transition, otherwise your state machine is blocked. For instance, you should not be waiting in a transition function for an event to happen, maybe even with a while loop. Waiting for the events only happens within the top-level while loop of the state machine (more on that later) that then calls you. (Therefore you are restricted to a few events, but they should be enough for now.)
Initial Transitions
To handle the initial transition, we just declare an extra transition function.
It is similar to the other transition function, but does not have the event parameter, since an initial transition is started always when a state machine starts.
    def initial_transition(self, timers):
        ### the initial transition

    def transition(self, state, event, timers):
        ### the remaining transitions
    def initial_transition(self, timers):
        ### the initial transition

    def transition(self, state, event, timers):
        ### the remaining transitions
Final state
To make a transition into the final state, just return the special name "final" as next state, and the state machine will terminate.
Decisions
Transitions can also contain decisions, which means that they can branch into different target states depending on the value of variables or results of functions. We can encode such decisions simply by yet another if-statement in our transition function.
In the example below, we change our blinking light so that is automatically stops to blink when the surrounding light level goes above 100. (Not sure if that is useful, but it's just an example.)
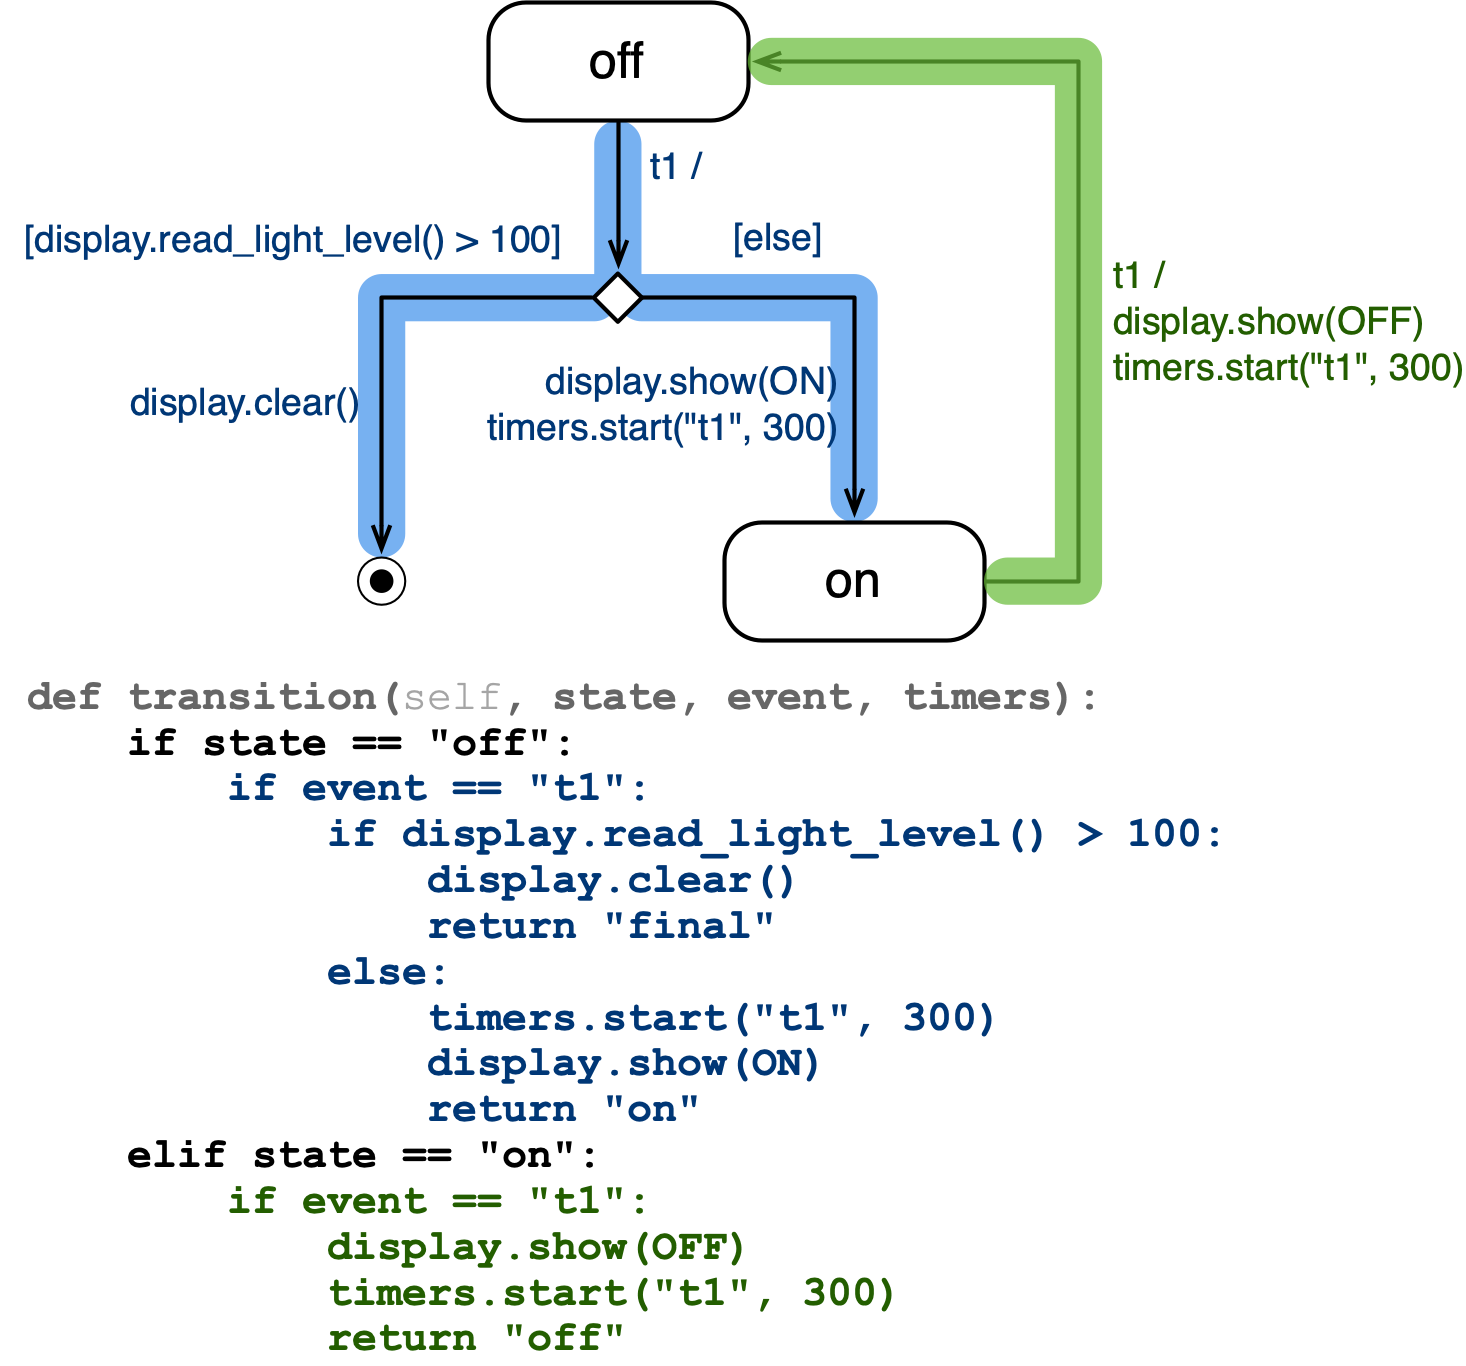
In the blue part of the code above, you see now three nested if statements,
- the first one distinguishing the current state
- the second one for distinguishing the event
- the third one to implement the decision in the transition
(In each state we currently only accept a single event, so the second if statement in this example is strictly speaking not necessary, but you get the idea: A more complex machine can have more than one outgoing transition in each state.)
Running Your State Machine
So far, we have only considered the transition functions. We have not told you about the logic that makes the entire state machine work. That means, the logic that
- keeps track of the state,
- takes care of the timers,
- detect events,
- calls the transition functions.
We have put all this logic into a Python structure called a class. This is a concept from object-oriented programming, which will come later in your programming courses. It makes the definition of your own state machines much easier, and you don't have to understand object-orientation and classes completely to use it. There is only a few things to take care of:
class MyStateMachine1(StateMachine):

    def initial_transition(self, timers):
        ### the initial transition

    def transition(self, state, event, timers):
        ### the remaining transitions
class MyStateMachine1(StateMachine):

    def initial_transition(self, timers):
        ### the initial transition

    def transition(self, state, event, timers):
### the remaining transitions- You declare your code inside a class. Use a new name for each example, here we have used
MyStateMachine1as name. - You extend the base state machine by declaring it in the parentheses behind your class name, in
class MyStateMachine1(StateMachine). - The two transition methods that you declare have the parameter
self.
This has the following effect: Your state machine MyStateMachine1 "inherits" all functionalities that the base state machine StateMachine has already implemented. We just add our transition methods, which is enough to make the state machine do what we want.
Running The Machine
To run your state machine, you need then to declare a variable of it and call the run() function it inherited from the base state machine:
stm = MyStateMachine1()
stm.run()
stm = MyStateMachine1()
stm.run()
Variables
This also explains how we handle variables: The variable is not a part of the global context, but tied to our state machine. We therefore always use the prefix self. before the variable.
In the listing below we initialize a variable x when we start the machine in the initial transition and assign a new value in the transition function. The prefix self refers to the parameter we get from both of these functions.
class MyStateMachine1(StateMachine):

    def initial_transition(self, timers):
        ### the initial transition
        ### init a variable x
        self.x = 0

    def transition(self, state, event, timers):
        ### the remaining transitions
        self.x = self.x + 1
class MyStateMachine1(StateMachine):

    def initial_transition(self, timers):
        ### the initial transition
        ### init a variable x
        self.x = 0

    def transition(self, state, event, timers):
        ### the remaining transitions
        self.x = self.x + 1