Chatting via MQTT
Goal: We want to use a simple Chat UI to create a chat system so that all teams can chat together. Our chat should then have the following features:
- Sends messages.
- Sends delivery receipts, so that the sender sees that a message has reached the device of the receiver.
- Sends read receipts, so that the sender knows when the message was visible in the user interface.
- Sends typing hints, so that chat partners see when the other side is starting to type a message.
Today's sub-goals:
- In Step 1, we will have a look at the chat user interface to get familiar with it, but do not send any messages between each other.
- In Step 2, we use MQTT and the debugging tool MQTTX to send messages between each other, in some raw way, but without a proper chat user interface.
- In Step 3, we connect Chat User Interface with MQTT to send and receive messages.
- In Step 4, we add delivery receipts, read receipts and typing indications.
Step 1: The Chat User Interface
The Chat UI is a Python class that shows the history of chat messages with each contact, and allows us to send messages. We interact with it in two ways:
- By function calls, when we want to change something in the UI. That means, we want to do something, and we cause an effect in the user interface. These are events that are initiated outside of our specific user interface instance.
- By callbacks, when the UI wants to inform us about something, like that the user clicked the "Send" button and wants to send a chat message. These are events that are initiated by our user working with the user interface, that means, initiated inside of the user interface.
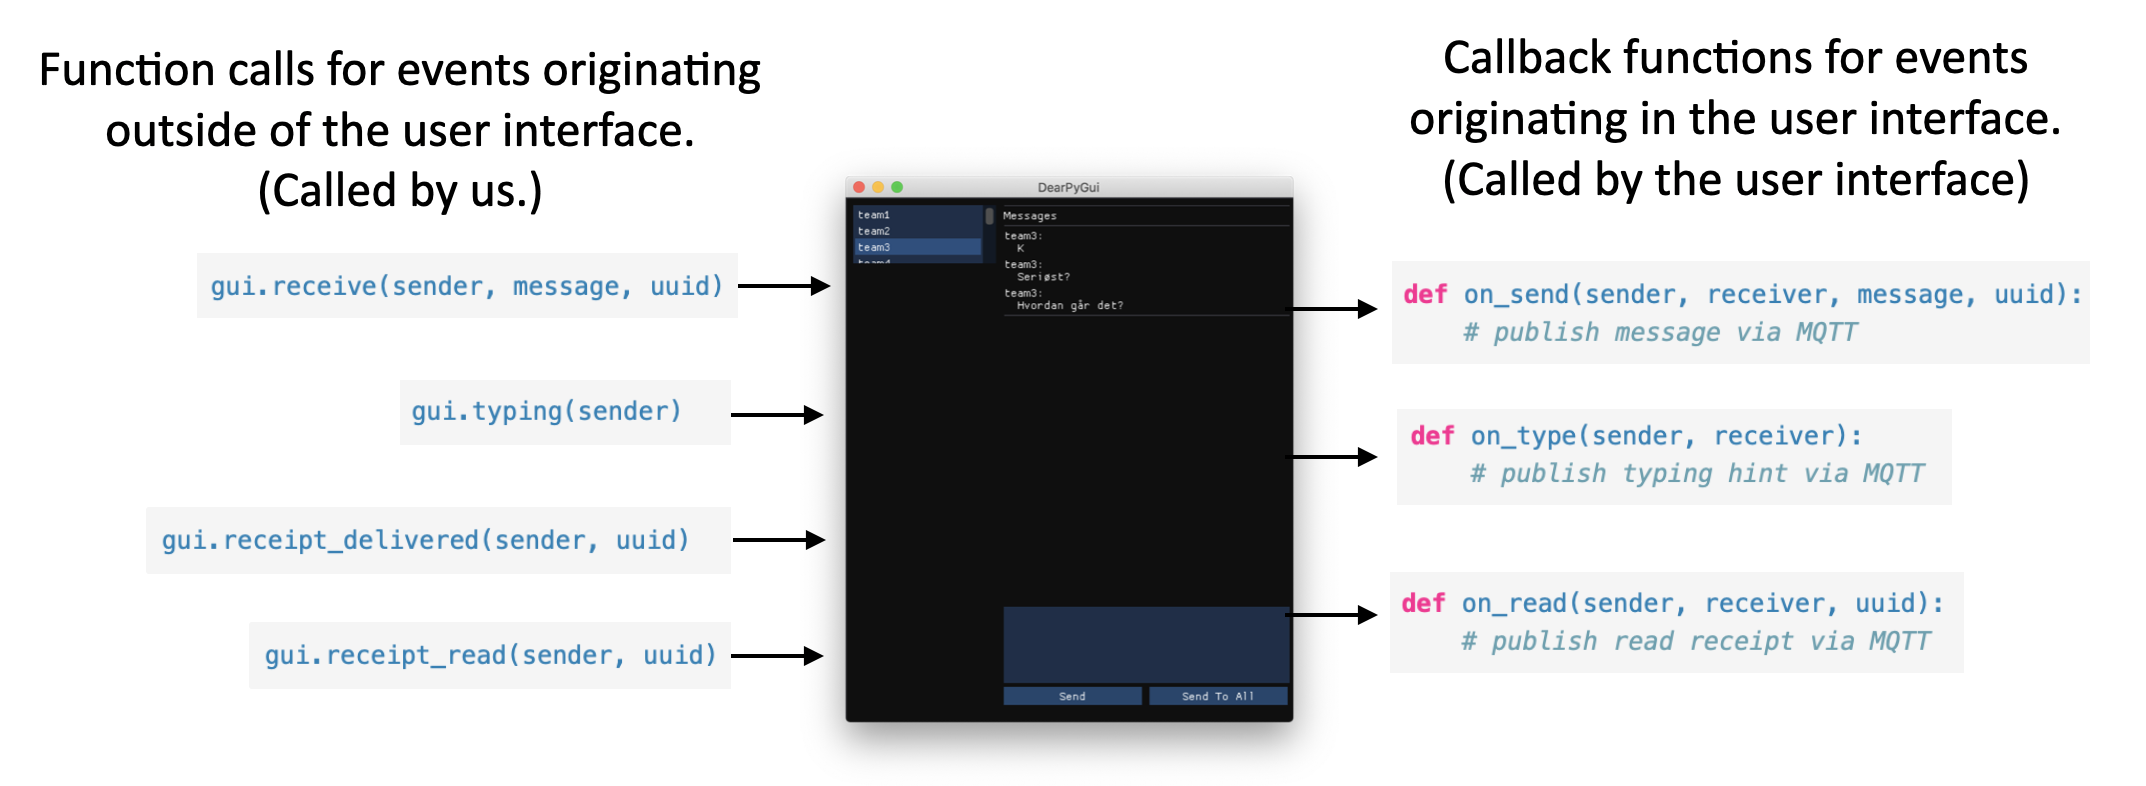
Chat UI Function Calls
Here a list of things that we want the user interface do when we ask it to. This is done by function calls.
Receiving Messages
When we receive a message, we tell the UI by calling the following function:
gui.receive(sender, message, uuid)
gui.receive(sender, message, uuid)The sender is the originator of the chat message, and message is the content of a message as a string. Each message is associated with a UUID, a universally unique identifier. This is a unique name, so that we later can associate delivery and read receipts with each message.
Receiving Delivery Receipts
We can tell the UI that we received a delivery receipt by calling the following function:
gui.receipt_delivered(sender, uuid)
gui.receipt_delivered(sender, uuid)The user interface will then add the suffix (delivered) behind the message.
Receiving Read Receipts
We can tell the UI that we received a read receipt by calling the following function:
gui.receipt_read(sender, uuid)
gui.receipt_read(sender, uuid)The user interface will then add the suffix (read) behind the message.
Receiving Typing Hints
We can tell the UI that we received a typing indication with the following call:
gui.typing(sender)
gui.typing(sender)The user interface will then show Team 1 is typing... right under the conversation list with that contact.
Chat UI Callbacks
But what about actions that originate at the user interface? Like when the user clicked the Send button --- then the user interface wants to call us, so that we can forward that chat message.
Sending Messages
Messages are sent when the sender writes a message in the message field and clicks Send. The UI lets us know about this by calling the following function:
def on_send(sender, receiver, message, uuid):
    # publish message via MQTT
def on_send(sender, receiver, message, uuid):
    # publish message via MQTT
Read Receipts
When a message is read, the UI calls the following function. This happens whenever the chat history gets visible to the user.
def on_read(sender, receiver, uuid):
    # publish read receipt via MQTT
def on_read(sender, receiver, uuid):
    # publish read receipt via MQTT
Typing Hints
Whenever we start typing, we send a typing hint to the chat contacts. The UI informs us about typing with the following function:
def on_type(sender, receiver):
    # publish typing hint via MQTT
def on_type(sender, receiver):
    # publish typing hint via MQTT
Install the Chat UI
The UI is written with a library that is called DearPyGui. You can install it as usual:
python3 -m pip install dearpygui
python3 -m pip install dearpyguiOn windows, you may receive the following error message when you start the program:
>>> import dearpygui.*
Traceback (most recent call last):
    File "", line 1, in
ImportError: DLL load failed: The specified module could not be found.
>>> import dearpygui.*
Traceback (most recent call last):
    File "<stdin>", line 1, in <module>
ImportError: DLL load failed: The specified module could not be found.
This is a known issue, discussed here. The solution is simple:
- Install vc_redist.x64.exe from https://support.microsoft.com/en-gb/help/2977003/the-latest-supported-visual-c-downloads. Then the program should run.
Chat UI Code
You can download a zip file with all source code for today's lab here: https://ttm4175.iik.ntnu.no/unit-p4/ttm4175-mqtt-source.zip
Unzip it and open it in Visual Studio Code.
Testing the UI
In this part, we only test how the user interface works, we are not yet sending any real messages between each other. Your task will only be to test the user interface and describe how it works, so that you get an understanding for it.
This is the code to test the user interface.
You can find it in file test_chat_gui.py.
from chat_gui import ChatGui

# TODO change to fit your team
my_id = "team1a"


def on_send(sender, receiver, message, uuid):
    print("Sending {} --> {} {}".format(sender, receiver, message[:5] + "..."))


def on_type(sender, receiver):
    print("Typing: {} --> {}".format(sender, receiver))


def on_read(sender, receiver, uuid):
    print("Read: {} --> {} {}".format(sender, receiver, uuid[:5] + "..."))


gui = ChatGui(my_id, on_send=on_send, on_type=on_type, on_read=on_read)

# We send in a fake message:
# gui.receive("x6", "Dette er en fake medling!", "absgdeff")

# We fake that chat partner x5 starts typing:
# gui.typing("x5")

gui.show()
Change the value of the variable my_id to match your team name. The team names have the form team1a, team1b, ... team12b. The ids x1 to x6 are for testing and the student assistants.
Testing Sending of Messages and Outgoing Typing Indicators
- Start writing a text, and have a look at the terminal in which you started the Python program. Which debug output do you get?
- Pause typing for 5 seconds, then type again. What happens?
- With some message in the message field, press the
Sendbutton. What happens in the UI and in the console? - Type again some text, and press
Send To Allthis time. What happens?
Testing Receiving and Read Receipts
For this test, we need to fake that we receive a message, we do that by using the method gui.receive(), where we send in a message. Activate this by uncommenting the line of code that sends a fake message.
- Start the program. The UI window should show as before the conversation with the first team selected.
- Observe the terminal again for any output messages.
- In the UI, switch to the conversation with
x6. What happens in the output?
Testing Incoming Typing Indicators
Our typing indicators behave a little bit different from other chat application, to make things a bit simpler for now. Let's test them. Activate this by uncommenting the line of code that sends a fake typing indication.
- Switch to the conversation with
x5. What do you see in the user interface? - Now switch to another conversation, then back to
x5. What do you observe?
Step 2: Chat Messages via MQTT
To send chat messages via MQTT between contacts, we need to agree on the content of the MQTT message and how we use our topics for publishing and subscribing.
Topic: We publish messages that carry a chat message to the topic ttm4175/chat/<receiver>/message. The <receiver> is the name of the contact we want to send the message to. So, if we want to send a chat message to team2a, that topic is ttm4175/chat/team2a/message
Payload: The payload should be a json-formatted string, with the following fields:
{"sender": "team1a",
 "receiver": "team2a",
 "message": "Hei!",
 "uuid": "16fd2706"}
{"sender": "team1a",
 "receiver": "team2a",
 "message": "Hei!",
 "uuid": "16fd2706"}
Check carefully to which topic you should subscribe so that you can receive messages for your team name.
Chatting via MQTTX
Let us first chat by MQTT only, that means, without the Chat UI from above. We only want to use MQTTX, and send and receive "raw" chat messages.
Install MQTTX, as explained in the preparation.
Add our broker that runs on campus, by adding a new connection:

Our broker has the address mqtt20.iik.ntnu.no and uses the default port 1883.
Enter the address as shown below.
Also give this connection a name to display. (We just use the same as the broker address.)
The client ID must be unique for each client, and MQTTX generates a random one for you automatically.
The other settings should remain their default.
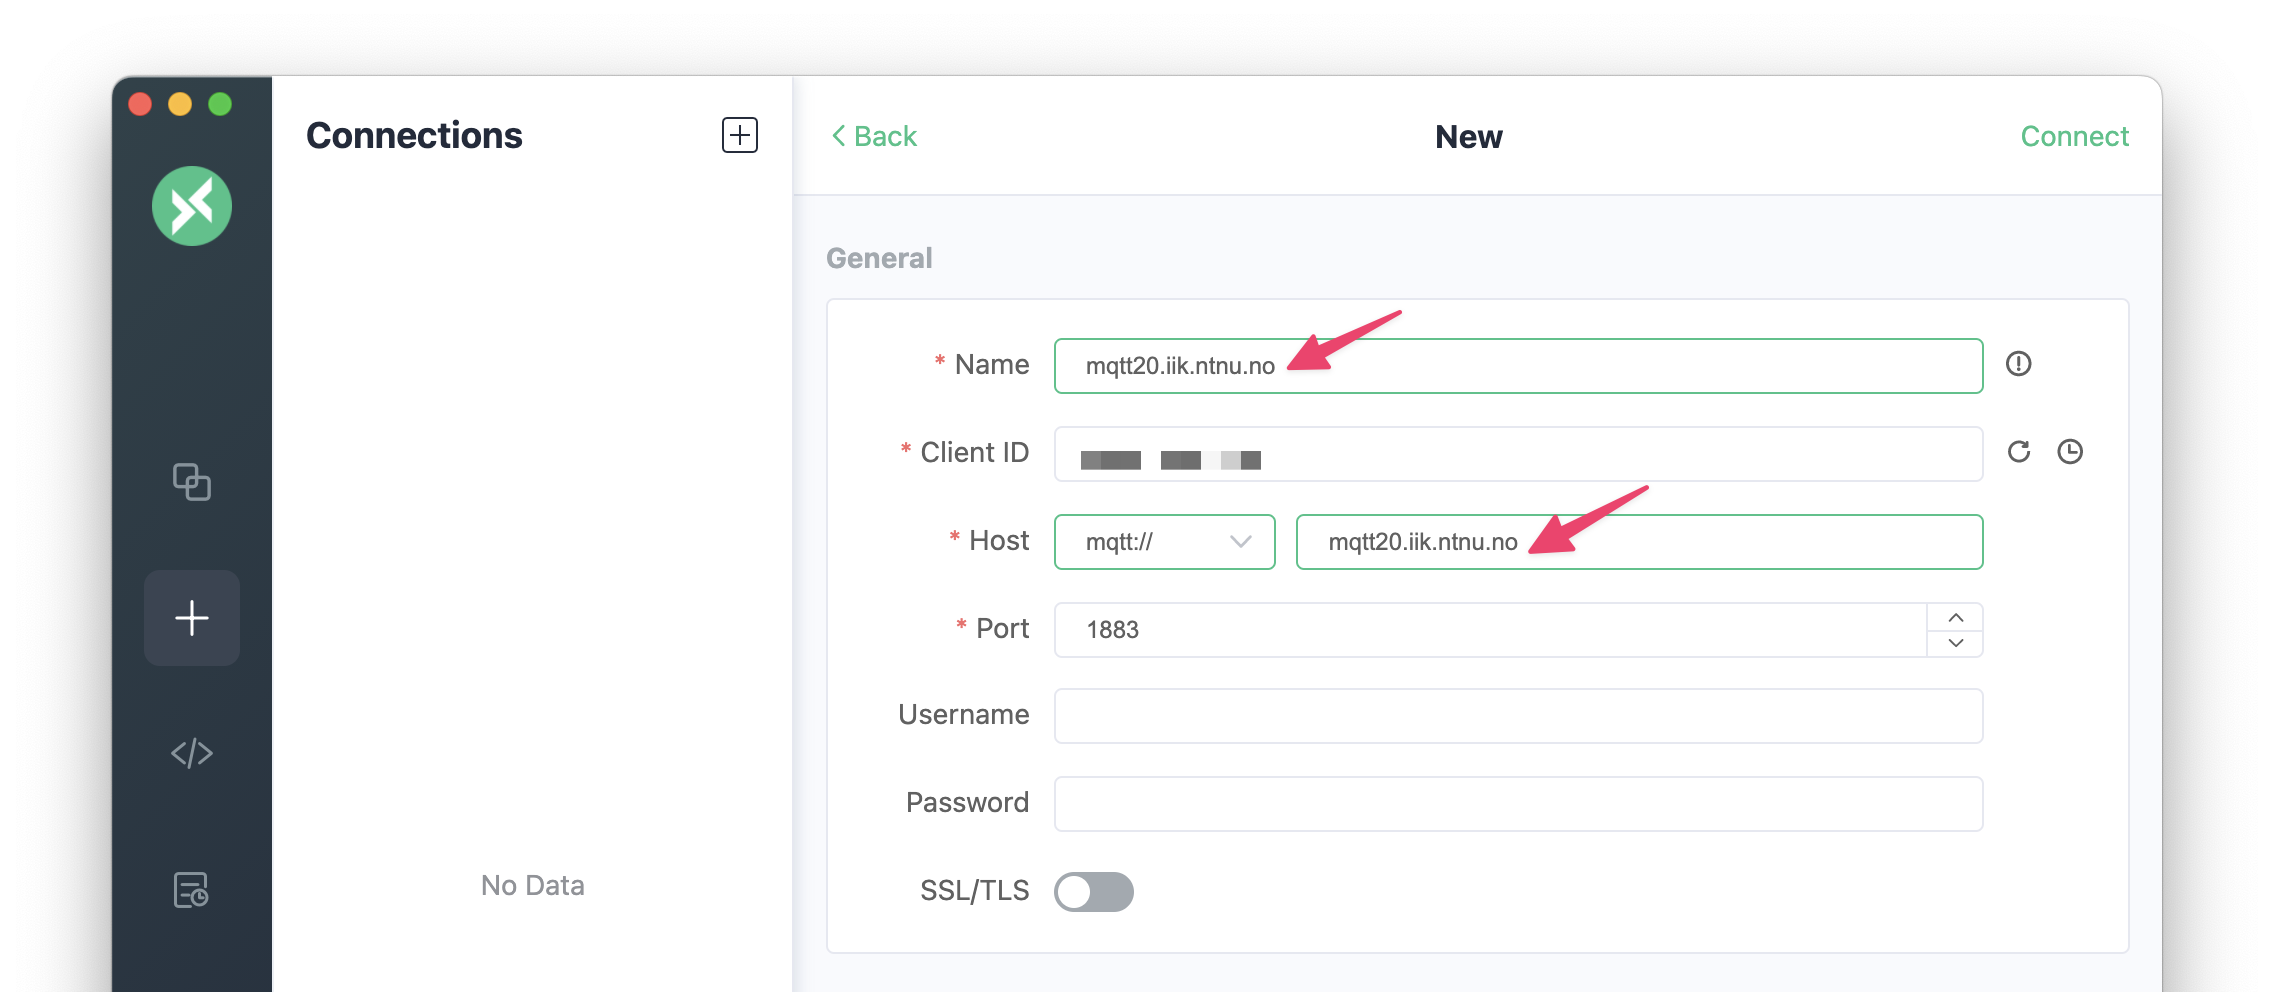
Then, click Connect and you should have a successful connection.

When selecting the connection on the left, you can now add subscriptions to topics, and publish (in the lower right corner).
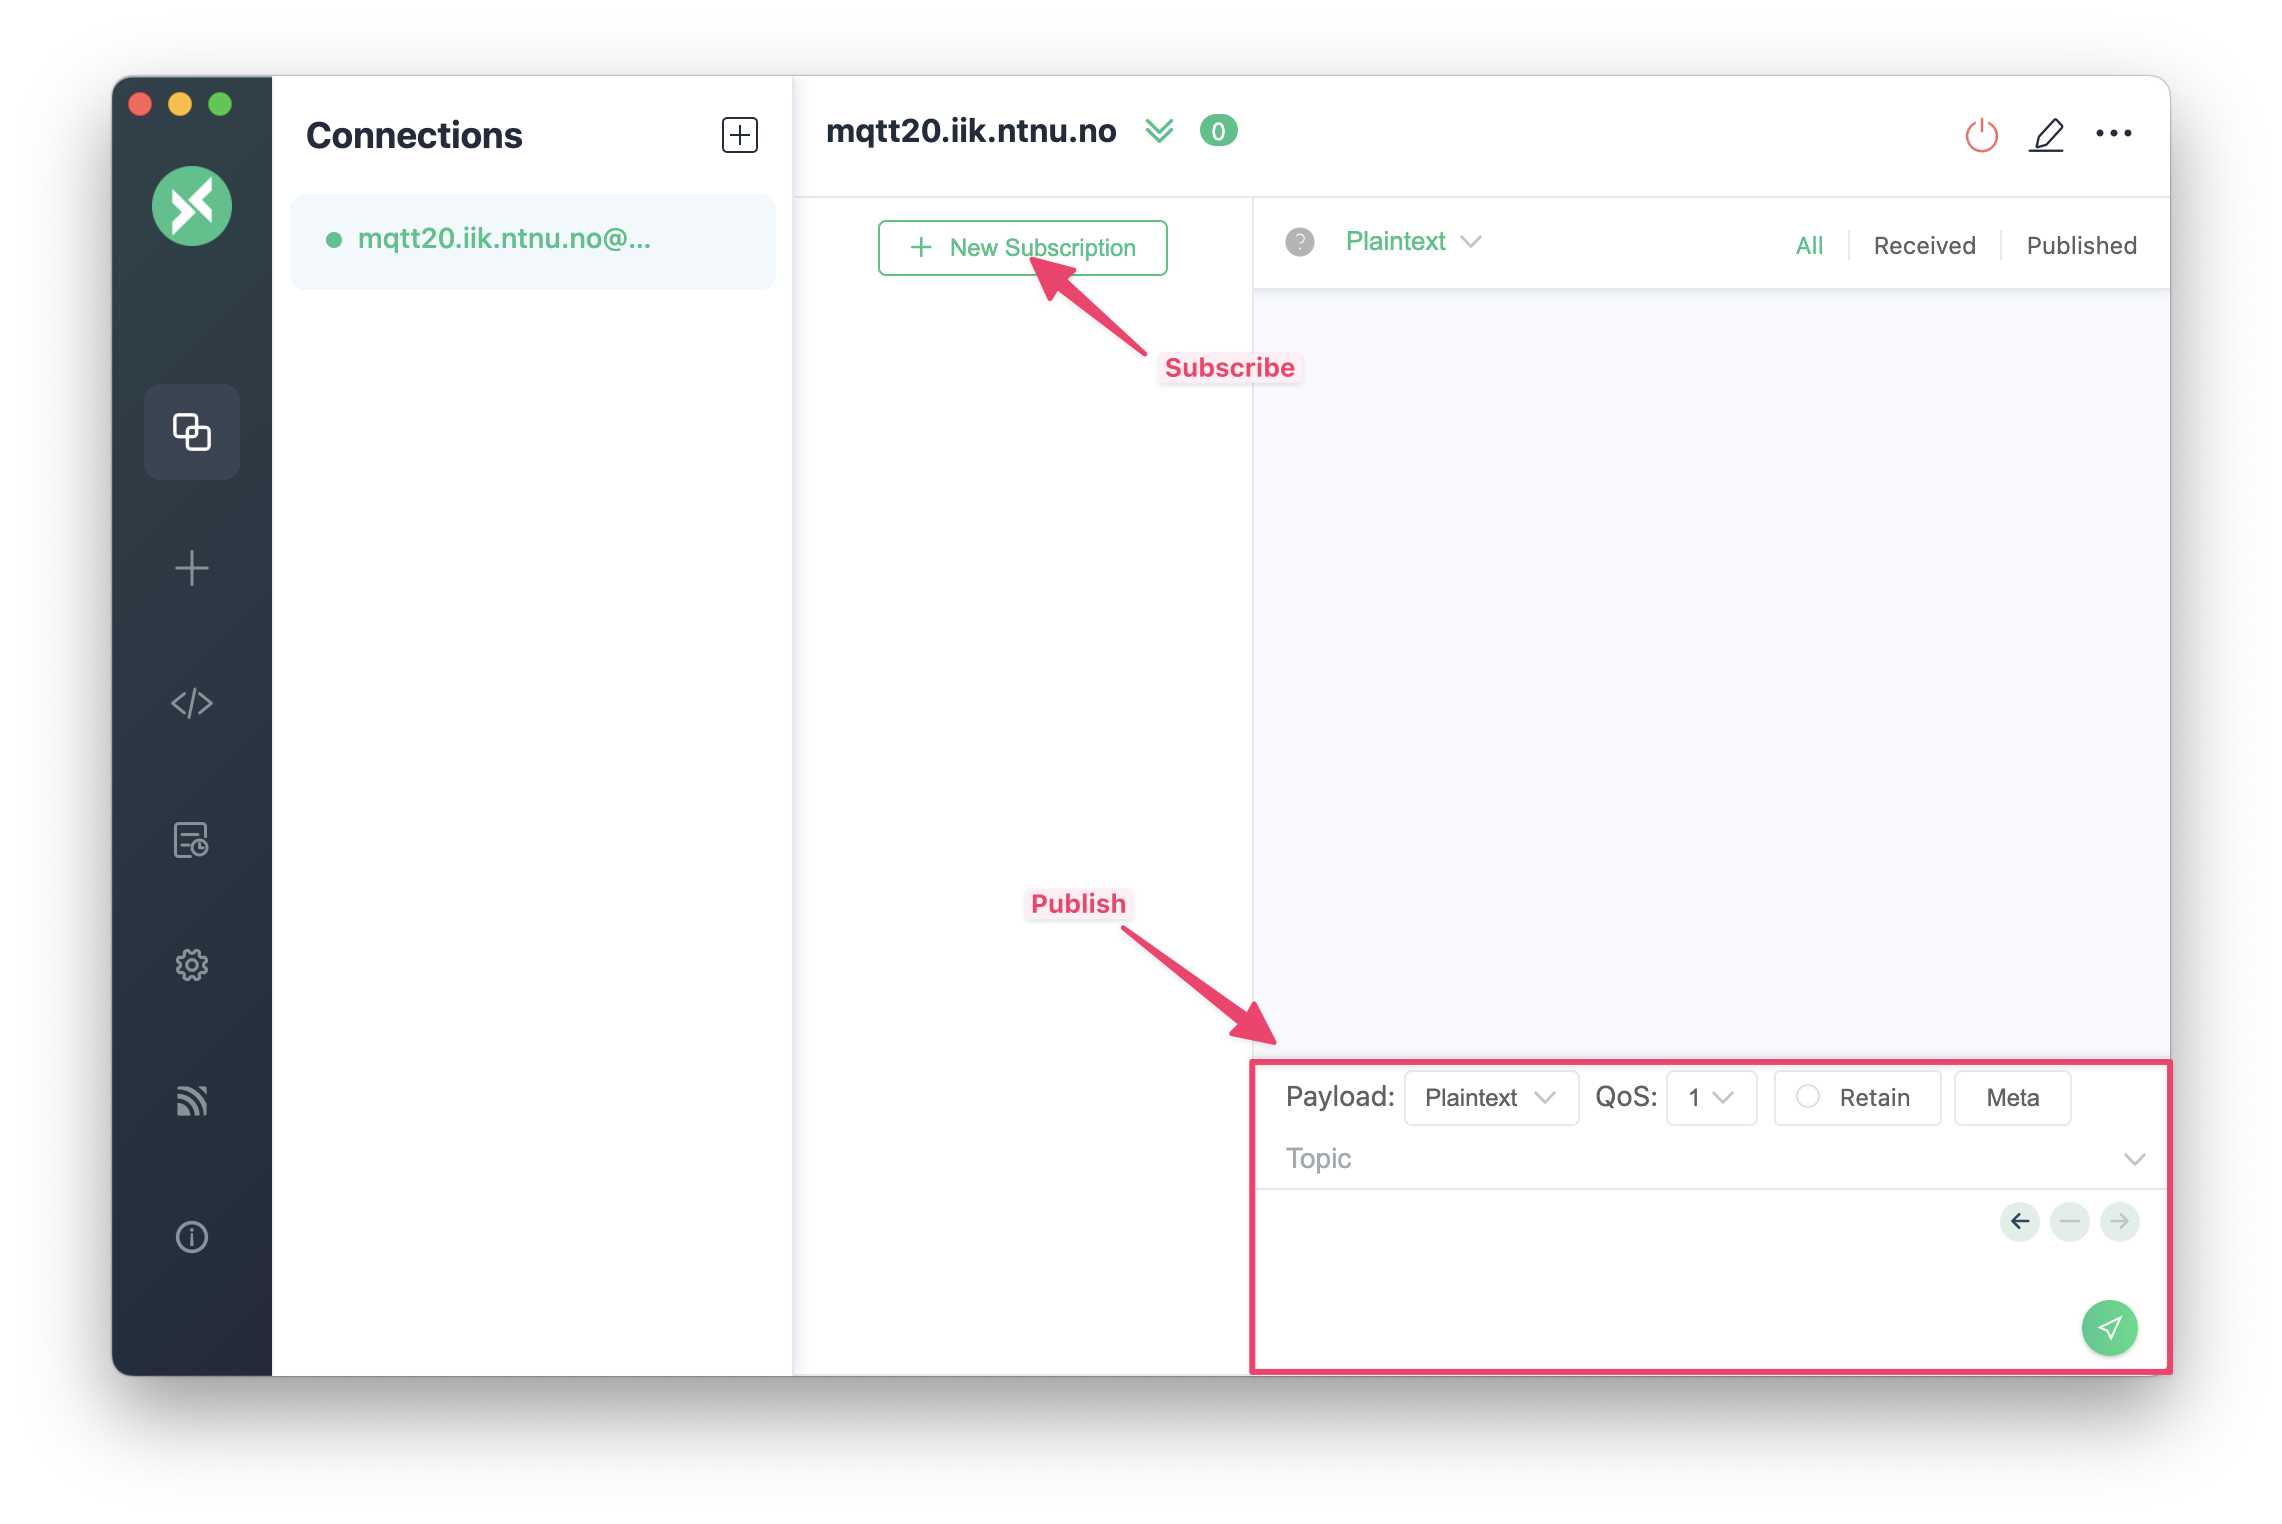
Work together with another team. Make sure both teams have the correct topics, and send messages between each other.
Step 3: Connecting Chat GUI and MQTT
So far, this happened:
- In Step 1, we had a look at the chat user interface to get familiar with it, but we did not send any chat messages.
- In Step 2, we used MQTT and MQTTX to send messages between each other, in some raw way, without a proper chat user interface.
Now we want to connect the chat user interface with MQTT, so that we can send and receive messages. We will not yet send receipts or typing indications.
From now on, you don't need MQTTX anymore, but it can be useful in case you need to debug. When you stay subscribed to some topics, you can see if you actually receive messages in case not everything immediately works as you think.
Code
The following code connects MQTT with that of the Chat UI.
You can find it in file chat_with_mqtt_step_1.py.
This code uses the paho-mqtt package, which you need to install via
python3 -m pip install paho-mqtt
python3 -m pip install paho-mqttHere is the code:
from chat_gui import ChatGui
import paho.mqtt.client as mqtt
import json

# TODO change to fit your team
my_id = "team1a"


# Called by MQTT client when we are connected
def on_connect(client, userdata, flags, reason_code, properties):
    if reason_code == 0:
        print("Connection succesful")
    if reason_code > 0:
        print("Connection failed")


# Called by the MQTT client for every message we receive
def on_message(mqttc, obj, msg):
    print(msg.topic + " " + str(msg.qos) + " " + str(msg.payload))
    try:
        data = json.loads(msg.payload)
    except json.JSONDecodeError as e:
        print("The payload is not valid json!")
        print(e)
        return
    if msg.topic.endswith("message"):
        gui.receive(data["sender"], data["message"], data["uuid"])
    else:
        print("Unknown topic: {}".format(msg.topic))


mqttc = mqtt.Client(mqtt.CallbackAPIVersion.VERSION2)
mqttc.on_message = on_message
mqttc.on_connect = on_connect
mqttc.connect("mqtt20.iik.ntnu.no", 1883)
mqttc.loop_start()
mqttc.subscribe("ttm4175/chat/{}/message".format("team1a"))


# Called by the Chat UI when we want to send a message
def on_send(sender, receiver, message, uuid):
    print("Sending {} --> {} {}".format(sender, receiver, message[:5] + "..."))
    payload_dict = {
        "sender": sender,
        "receiver": receiver,
        "message": message,
        "uuid": uuid,
    }
    payload_json = json.dumps(payload_dict)
    mqttc.publish("ttm4175/chat/{}/message".format(receiver), payload=payload_json)


# Called by the Chat UI when we start typing to somebody
def on_type(sender, receiver):
    print("Typing: {} --> {}".format(sender, receiver))


# Called by the Chat UI when we have read a message
def on_read(sender, receiver, uuid):
    print("Read: {} --> {} {}".format(sender, receiver, uuid[:5] + "..."))


gui = ChatGui(my_id, on_send=on_send, on_type=on_type, on_read=on_read)
gui.show()
Let's look at some details here:
-
The expression
"ttm4175/chat/{}/#".format(my_id)defines a string for a topic. Theformat()function replaces the contained pair of curly braces{}with the value of variablemy_id. -
The function call
json.loads()parses a JSON string and creates a Python dictionary. -
The function call
json.loads()is surrounded by atryexceptblock. This block handles the case that the JSON string is somehow not valid, and in that case abort the whole function and prints some output.
Exchange again the value of variable my_id to your team.
Examine the six lines of code starting with mqttc = mqtt.Client(mqtt.CallbackAPIVersion.VERSION2). What happens here?
How does our code tell the MQTT client to use the callbacks on_message() and on_connect()?
How does our code tell the chat ui to use the callbacks on_type(), on_send() and on_read()?
Send chat messages to another team, and check that you can also receive messages.
Step 4: Receipts and Typing Indications
By now, basic sending of messages should work, but we do not yet send delivery receipts, read receipts, or typing indications. Let's look at the MQTT message payloads and topics that we are going to use for those:
Delivery Receipts
When a message is delivered to a client, that means, received via MQTT, we acknowledge its delivery by publishing an MQTT message to the topic: ttm4175/chat/<receiver>/delivered
{"sender": "team1",
 "receiver": "team2",
 "status": "delivered",
 "uuid": "16fd2706"}
{"sender": "team1",
 "receiver": "team2",
 "status": "delivered",
 "uuid": "16fd2706"}
The original sender receives this delivery receipt and feed is back to the UI, so that it can add a delivery receipt to the message. Note that the sender field is here the sender of the delivery receipt.
Read Receipts
Read receipts are sent to topic ttm4175/chat/<receiver>/read.
{"sender": "team1",
 "receiver": "team2",
 "status": "read",
 "uuid": "16fd2706"}
{"sender": "team1",
 "receiver": "team2",
 "status": "read",
 "uuid": "16fd2706"}
Typing Indications
Typing indications are sent to topic ttm4175/chat/<receiver>/typing.
{"sender": "team1",
 "receiver": "team2",
 "status": "typing"}
{"sender": "team1",
 "receiver": "team2",
 "status": "typing"}
Inspect the code of the file chat_with_mqtt_final.py. Answer the following question in the report:
- Look at function
on_message(). Compared to the version inchat_with_mqtt_step_1.py, how did it change? - Look at functions
on_type()andon_read(). What is happening here?
This final version of the chat program should receive also send receipts and typing indications. How do you need to expand the topic subscription after you connected to the MQTT broker, so that you also receive these messages?
Change the line with the topic subscription so that you can also receive receipts and typing indications.
Note: There is a one-line solution to do this, but you can also use a solution that uses several lines.
Coordinate with another team, and explore the delivery and read receipts and the typing indications. Does all work?
Try to figure out from the code how we send the delivery receipts. Is the user interface involved in this?
Task
Create a sequence diagram between two chat clients and the MQTT broker in between.
- Both client startup, connect to the broker and subscribe to their topics.
- The sender starts typing, and takes more than 10 seconds to type a message.
- The sender sends the message, which then arrives at the receiver.
- The user on the receiver side eventually reads the message.
The headers of the sequence diagram should look like this:

Use messages of type:
connect and disconnect(client to broker)subscribe(topic)(client to broker)send(topic, data)(client to broker, and broker to client)
You can illustrate the data, or add a comment.